|
After the frames were set up and checked, the bevels were cut with a sharp hand plane, and a disk-sander. A batten was used
to check and make sure everything was fair.
The keel notches were cut with a saber saw, and limber holes were cut also. 2 layars of 3/4" by 3 1/2" pine were
laminated together to form the keel. The forward keel was cut to a pattern out of 3/4" pine, laminated together, and
then glued into notches cut in the forward bulkheads.
The stem was 3 layars of 3/4" pine, ripped to the correct angle, and then laminated together. (probably overkill, 2 layers
would have been sufficiant.) The stem was then glued to a notch in the forward keel piece, with temporary supports keeping
it at the correct angle.
Notches were cut for the chine logs, which will be 3/4" by 2" pine. A Skillsaw was used. the blade was set 3/4"
plus the thickness of the batten, which was screwed between frames for the saw to rest on. Then multiple cuts were made, and
then cleaned up with a rasp and chisel.
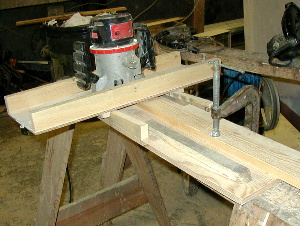
3/4" by 2" pine was scarfed into 20 foot lengths for the chine logs. I made a simple scarfing jig for the router,
(see picture below)which made cutting the scarfes quick and simple.
The forward end of the chine logs were cut to an
angle to but against the stem, and then they were glued in place, using drywall screws, which were later removed. (when using
drywall screws, drill pilot holes in the piece being glued, so the screws will pull the parts together. If the screws are
dipped in paste-wax, they are easier to remove.)
The chine logs and keel were planed with a hand plane, and checked with a batten.
The bottom panels were cut to fit from 1/2" plywood. The forward panels were ripped into 2" strips because of the
extreme twist. A temporary batten was screwed to the forward panel to keep it from flopping all over. The location of the
frames was marked under each panel, and pilot holes were drilled.
8" butt blockes were cut out also.

|
| Router jig |
|

